Installing a water softener can dramatically improve your home’s water quality by removing minerals that cause hard water. If you’re dealing with scale buildup, dry skin, or appliance wear, a properly installed system can fix these issues quickly.
This guide is written for homeowners who want a clear, no-fluff process they can follow step by step.
Can You Install It Yourself?
Yes, most homeowners can complete a water softener installation on their own.
DIY is a good option if:
- Your main water line is easy to access
- You have basic plumbing tools
- No major pipe modifications are needed
You should consider professional help if:
- Your plumbing system is complex
- You need to cut or reroute multiple pipes
- Local building codes require licensed installation
In most cases, installing a water softener system takes 2–4 hours.
What You Need Before Installing a Water Softener
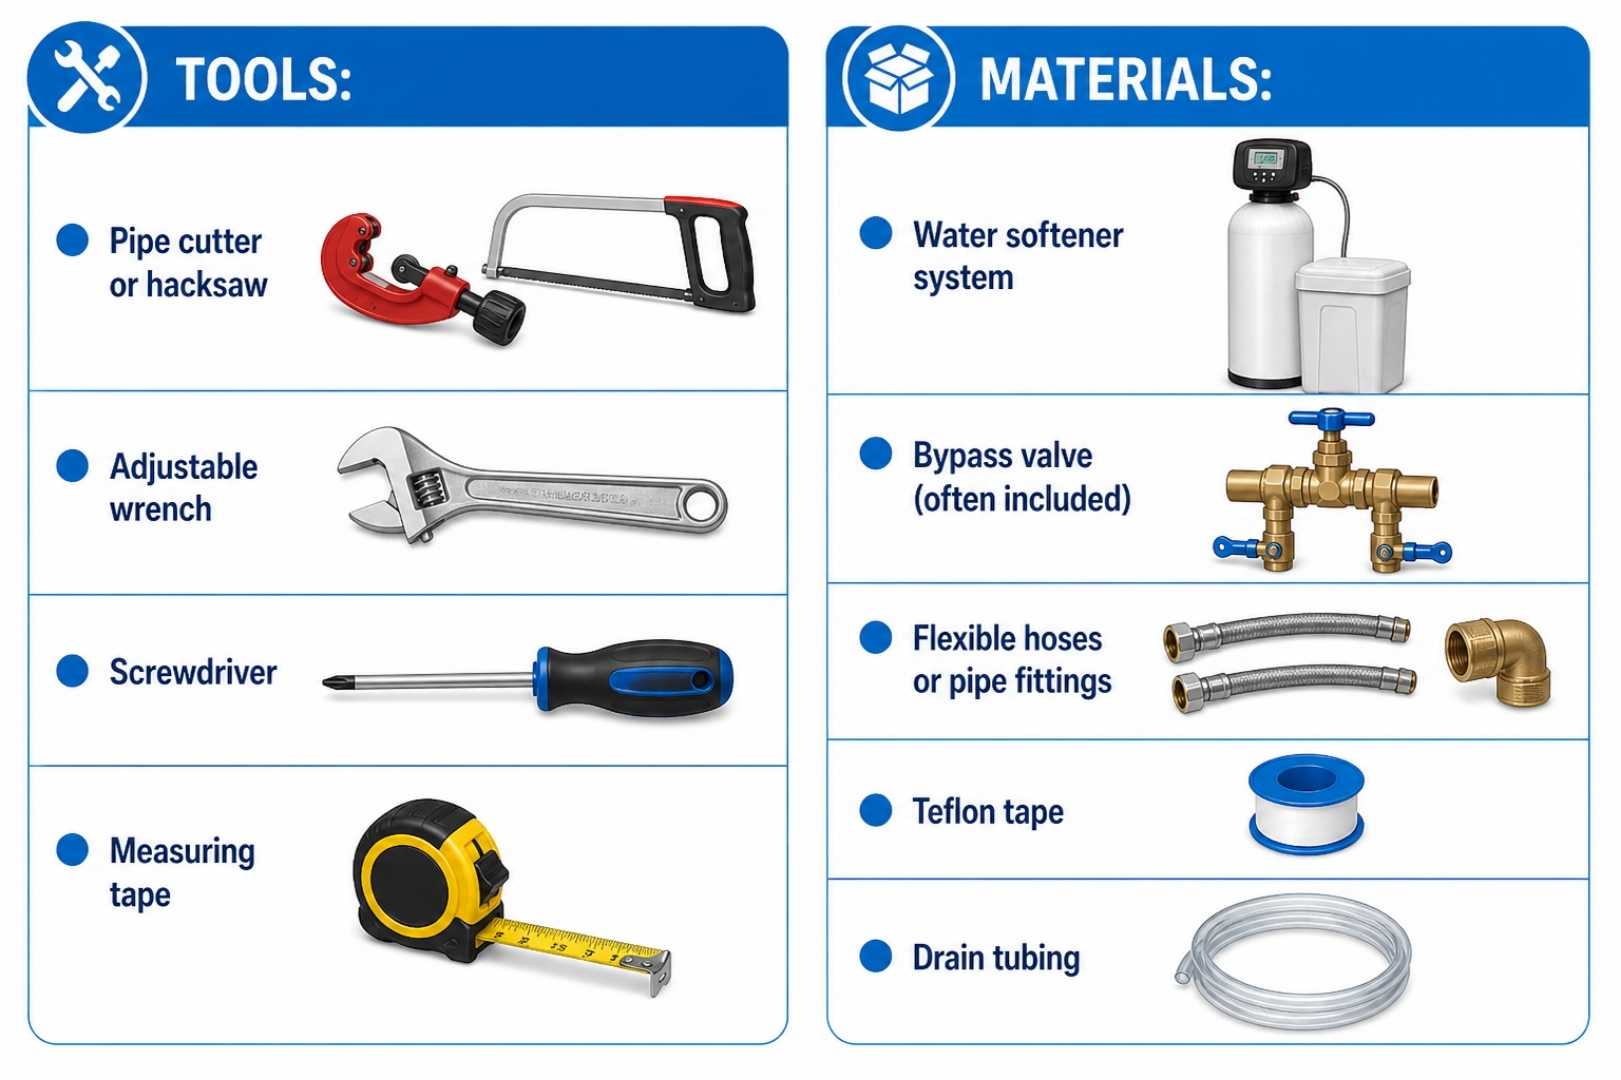
Before starting your water softener system installation, gather everything you need.
Tools:
- Pipe cutter or hacksaw
- Adjustable wrench
- Screwdriver
- Measuring tape
Materials:
- Water softener system
- Bypass valve (often included)
- Flexible hoses or pipe fittings
- Teflon tape
- Drain tubing
Having all tools ready ensures a smoother installation process without interruptions.
Where to Install a Water Softener in Your Home
Choosing the correct location is critical for performance.
Install your system:
- On the main water supply line
- Before the water heater
- Near a drain and electrical outlet
Best locations:
- Garage
- Basement
- Utility room
The goal is to ensure all water entering your home is treated.
Water Softener Installation Diagram
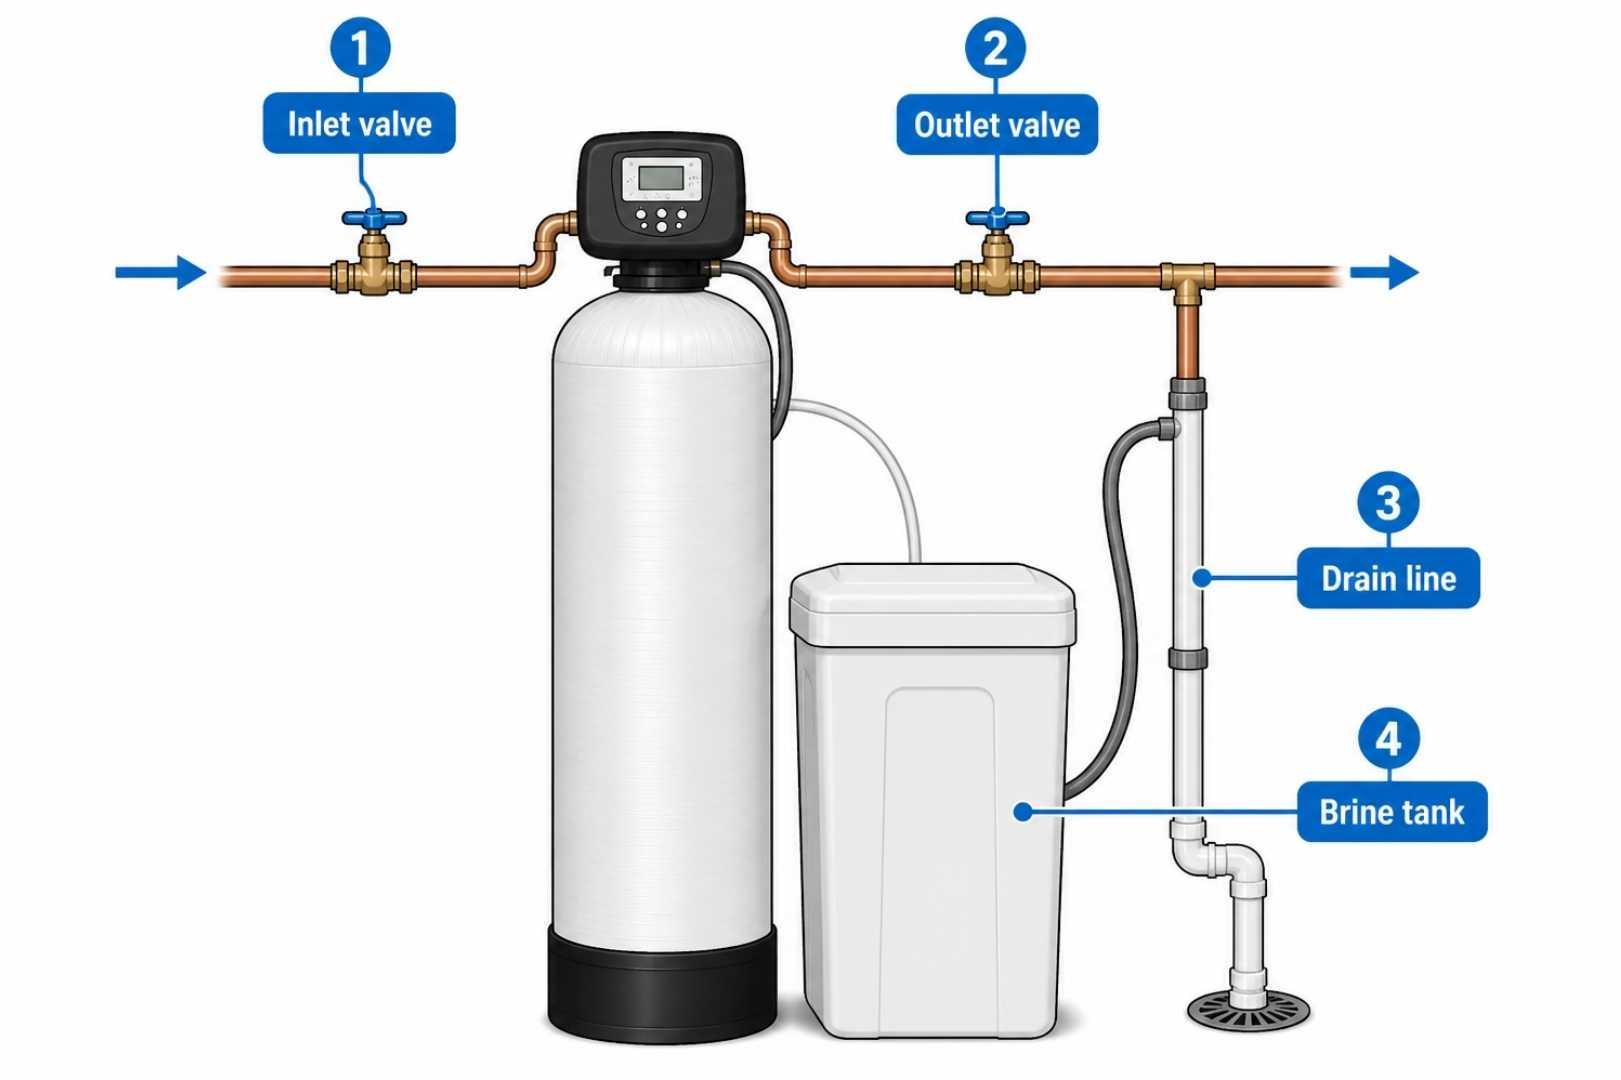
Understanding the setup makes installation much easier.
Basic Flow:
Main Water Line → Water Softener → Household Plumbing
Main Connections:
- Inlet valve: Hard water enters the system
- Outlet valve: Soft water flows to your home
- Drain line: Flushes minerals during regeneration
- Brine tank: Stores salt for cleaning cycles
Think of it as a loop: water comes in, gets treated, and exits clean.
How to Install a Water Softener System
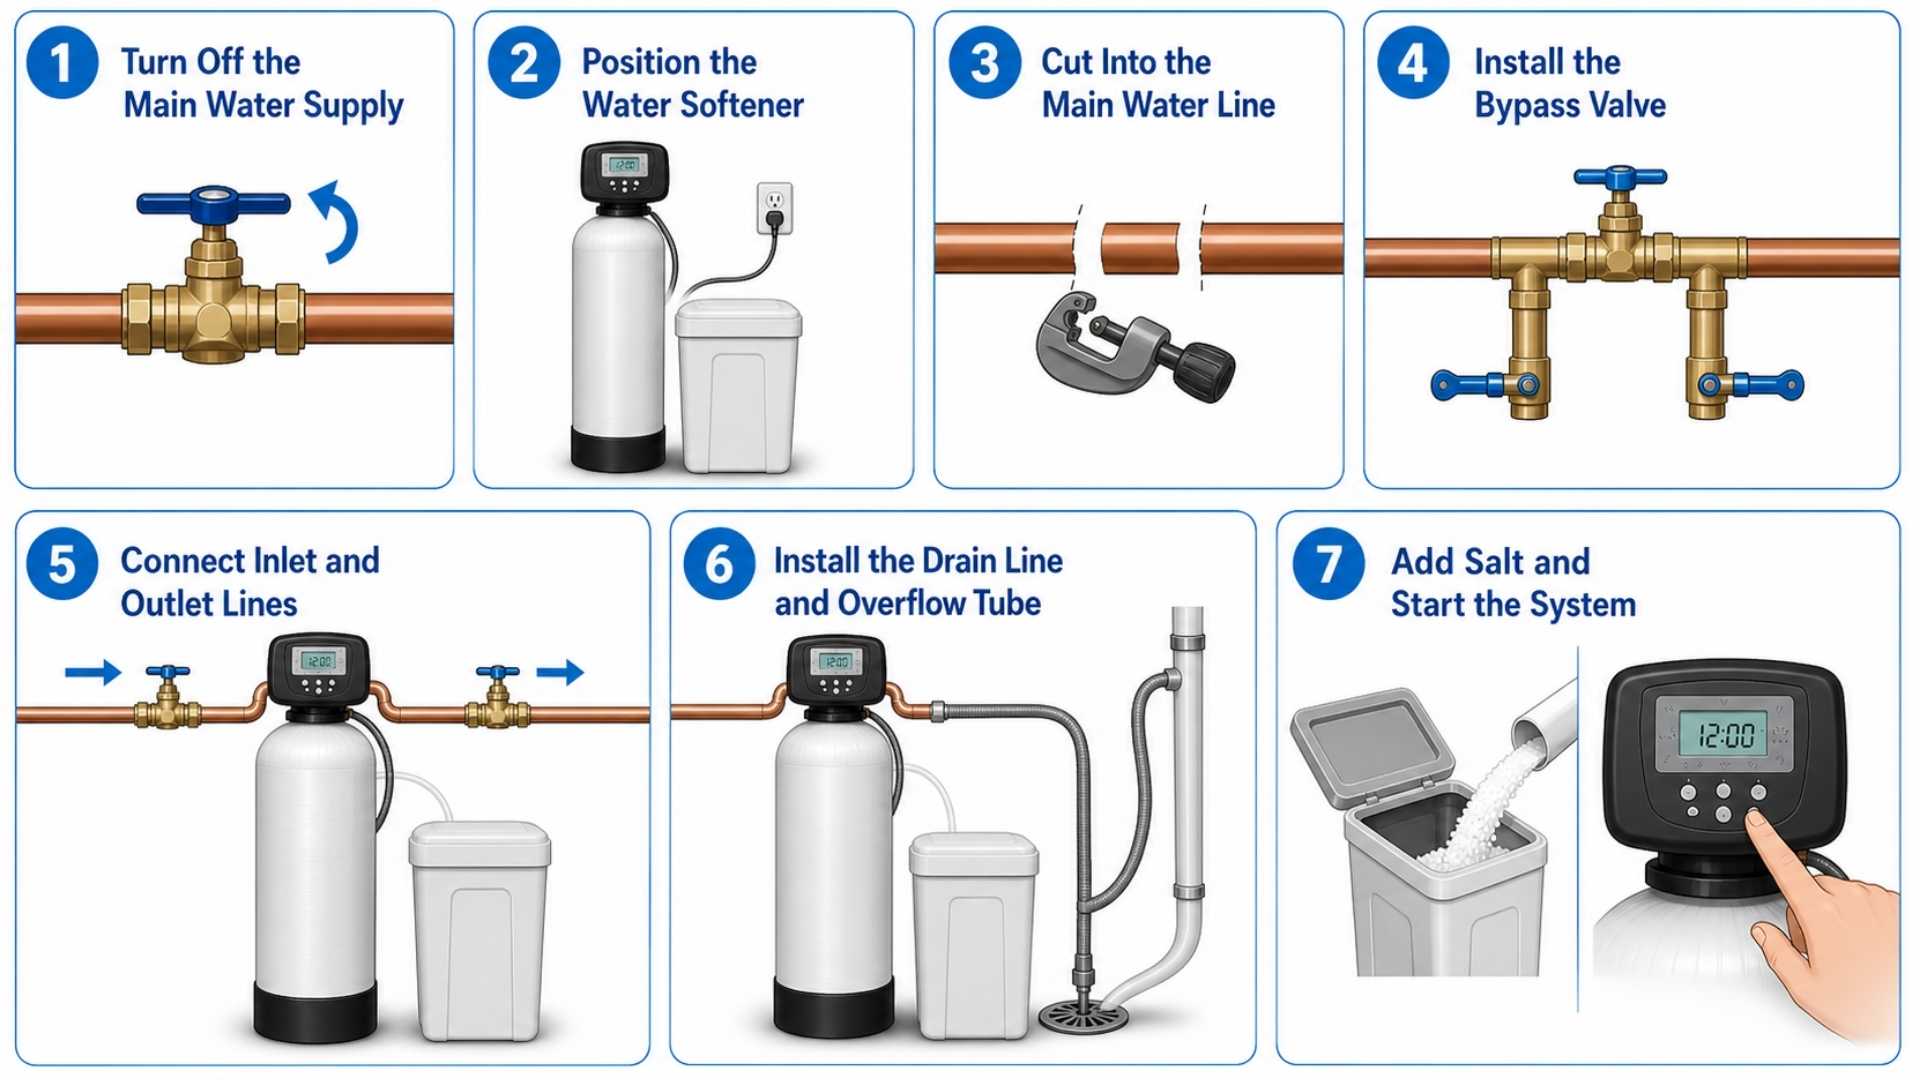
Follow these 7 steps for a successful water softener install:
Step 1: Turn Off the Main Water Supply
Shut off the water supply and open faucets to drain remaining water.
This prevents pressure and leaks during installation.
Step 2: Position the Water Softener
Place the unit near the main water line, drain, and power source.
Ensure there’s enough space around it for maintenance.
Step 3: Cut Into the Main Water Line
Use a pipe cutter to cut the section where the softener will connect.
Measure carefully before cutting to avoid mistakes.
Step 4: Install the Bypass Valve
Attach the bypass valve to the system.
This allows you to isolate the softener without shutting off water to the house.
Step 5: Connect Inlet and Outlet Lines
- Connect inlet to the main water supply
- Connect outlet to your home’s plumbing
Follow directional arrows carefully—incorrect connections will prevent proper operation.
Step 6: Install the Drain Line and Overflow Tube
- Connect the drain hose to a drain or standpipe
- Maintain an air gap to prevent backflow
- Attach overflow tubing to the brine tank
This step is essential for safe system operation.
Step 7: Add Salt and Start the System
- Fill the brine tank with salt
- Turn water back on slowly
- Plug in the system and run the first regeneration cycle
Your water softener installation is now complete.
Common Mistakes to Avoid During Installation
Avoid these issues when installing a water softener system:
- Reversing inlet and outlet connections
- Skipping the bypass valve
- Incorrect drain line placement
- Over-tightening fittings
- Not checking for leaks after installation
These mistakes can reduce efficiency or damage your system.
How to Maintain Your Water Softener
Once your water softener is installed, proper maintenance keeps it running efficiently.
Maintenance Tips:
- Refill salt regularly
- Clean the brine tank every 6–12 months
- Check for salt bridges
- Inspect hoses and connections
Routine maintenance helps extend system life and maintain water quality.
Wrap-Up
Installing a water softener is one of the best things you can do for your home — especially here in San Antonio where hard water is just part of life. Protect your pipes, your appliances, your skin, and your wallet.
If you’d rather have it done right the first time, B&D Water LLC has been installing water treatment systems across San Antonio for over 30 years. We’ll test your water for free, recommend the right system, and install it cleanly — no guesswork, no shortcuts.